
The SNES Super CIC mod is the best way to modify your SNES or Super Famicom console to play all region games.
Compatibility: 3 chip SNES or Super Famicom models.
Features:
- Play games from all regions. 100% compatible with all imports.
- Easy to install with only a few wires to solder.
- Switchless mod with no case alteration necessary.
- Change region by holding down the reset button or using the controller.
- Additional in-game reset feature, ideal for accessing flash cart menus.
- 50Hz, 60Hz, or auto-detect mode indicated by dual-led. (Red/Green/Orange)
Button Combinations:
- L + R + SEL + Y --> PAL Mode
- L + R + SEL + A --> NTSC Mode
- L + R + SEL + B --> Cartridge Region
- L + R + SEL + START --> Short Reset
- L + R + SEL + X --> Long Reset
The kit comes with a common cathode Red/Green LED, and you can choose which colours you like for PAL/NTSC when installing it.
Installation Instructions
1. Find a suitable place to stick down the EasySuperCIC & uIGR board with double sided tape.
Preparing CIC Chip / Connections
1. Locate the original CIC chip.
2. You can either Remove the Chip Completely or Lift Back Pins 1,2,10 and 11.
3. If you leave the chip in place and lift the pins, Remove the 10K Resistor from the EasySuperCIC & uIGR board.

4. Solder wire from CIC.1 (EasySuperCIC & uIGR board) -> Solder Pad Pin 1 (Original CIC Chip)
5. Solder wire from CIC.2 (EasySuperCIC & uIGR board) -> Solder Pad Pin 2 (Original CIC Chip)
6. Solder wire from CLK (EasySuperCIC & uIGR board) -> Solder Pad Pin 7 (Original CIC Chip) or S-CLK Chip Pin / Leg 6
7. Solder wire from CIC.8 (EasySuperCIC & uIGR board) -> Solder Pad Pin 8 (Original CIC Chip)
8. Solder wire from CIC.10 (EasySuperCIC & uIGR board) -> Solder Pad Pin 10 (Original CIC Chip)
9. Solder wire from CIC.11 (EasySuperCIC & uIGR board) -> Solder Pad Pin 11 (Original CIC Chip)
Preparing PPU Chips / Connections
1. Locate and Find S-PPU2 and S-PPU1 chips and lift the following 2 pins.
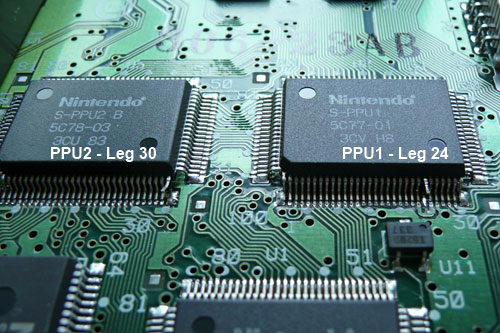
2. Solder wire from PPU (EasySuperCIC & uIGR board) -> Lifted Leg (PPU2 - Leg 30) & Lifted Leg (PPU1 - Leg 24)
Preparing Controller Port uIGR Connections
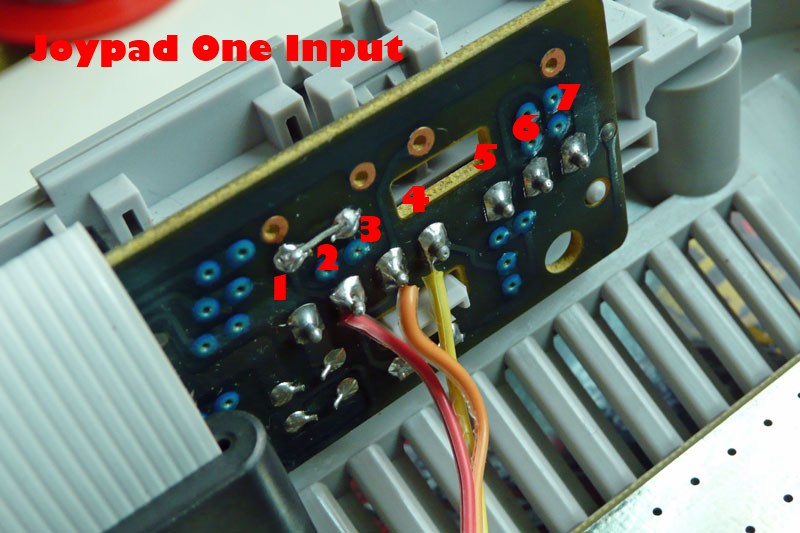
1. Solder wire from CON.2 (EasySuperCIC & uIGR board) -> Controller Port Pin 2 (As Shown In Picture Above).
2. Solder wire from CON.3 (EasySuperCIC & uIGR board) -> Controller Port Pin 3 (As Shown In Picture Above).
3. Solder wire from CON.4 (EasySuperCIC & uIGR board) -> Controller Port Pin 4 (As Shown In Picture Above).
Preparing Power / Region LED Connections
1. Remove the original RED LED from the Controller Port.
2. Bend the legs of the new LED provided and solder the Middle pin of the LED to the point shown.
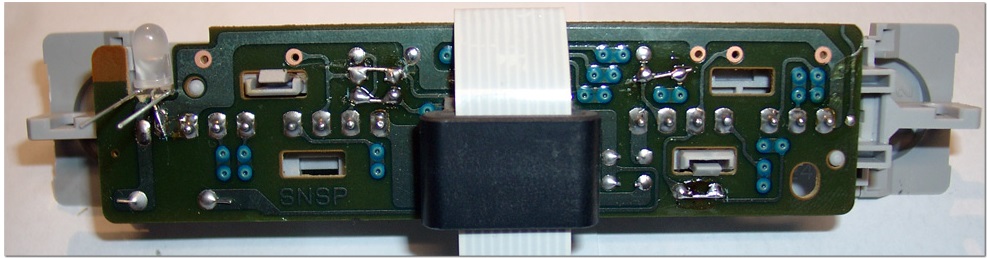
3. Connect the Left Leg of the New LED -> LED.R (EasySuperCIC & uIGR board).
4. Connect the Right Leg of the New LED -> LED.G (EasySuperCIC & uIGR board).
Preparing Power Connections
2. Solder wire from GND (EasySuperCIC & uIGR board) -> Solder Pad Pin 9 (Original CIC Chip) or Another GND Point Located On Motherboard.
Done
SNES EasySuperCIC & uIGR Region Free Mod Kit
- Product Code: SNES EasySuperCIC & uIGR Region Free Mod Kit
- Reward Points: 17
- Availability: 37
-
£17.00
- Price in reward points: 170
Tags: super famicom, snes, super nintendo, supercic, uigr, region free