
The Medusa Kit lets you connect a wide variety of Bluetooth enabled controllers to your PS1 console using the BlueRetro platform.
It is compatible with the original "Fat" Playstation 1
console.
It features a seperate board with 5 status LED's and a Touch Sensor!
You can also still use the original Wired Controllers thanks to the Current Mirror circuit.
It is very easy to install with just basic tools. however, with the SCPH-100x, some small shell cutting is required.
You can use PS3, PS4, PS5, Xbox One, Xbox Series X/S, Wii, WiiU Pro, Switch Pro, Switch Joycon. 8bitdo controllers and many more.....
Special Thanks To:
darthcloud for developing the BlueRetro platform :) - BlueRetro Github
mancloud89 for developing the Current Mirror circuit :) - ManCloud Github
Please Note: There is an issue within a very very very small handful of PU-18 motherboards that make random controller presses when using the BlueRetro platform. This happens because of design flaws within the motherboard. We have taken every step in this product to make sure that this doesn't happen, but it may still occur.
Installation Instructions
Package Contents:
1 x Medusa Main /Sub Board.
1 x External WiFi / Bluetooth Antenna.
1 x 3D Printed Drill Template (Only needed for SCPH-100X consoles).
Step 1: You need to dissasemble the console and remove the controller port block.
Step 2: Snap off the Medusa Sub Board from the Medusa Main Board.
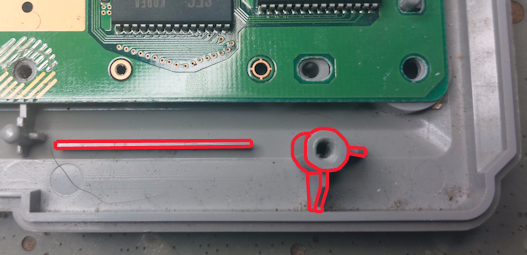
Step 3: Locate the 2 pins circled, these need to be completely isolated using a sharp precision knife.

Step 4: You'll see in here that the 2 pins have been completely isolated using 4 track cuts.

Step 5: Place the Medusa Main Board over the controller port pins and solder all the points shown in RED.
Step 6: Connect one end of the included ribbon cable with the BLUE tab facing UPWARDS to the connector on the Medusa Main Board.
If you have a 100x series console, please follow these steps otherwise, skip to step 8.
Step 7A: Fully dissasemble the console and remove the bottom metal shielding.
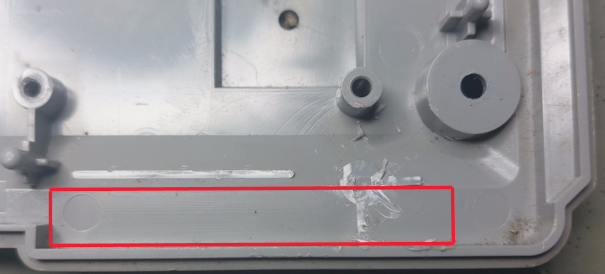
Step 7B: The plastic pieces shown in RED need to be fully trimmed and removed.
Step 7C: Make sure the area in RED is completely flat and flush, this is really important!.
Step 7D: Using pliers, bending back and forth, remove the 2 pieces of metal shown in RED.
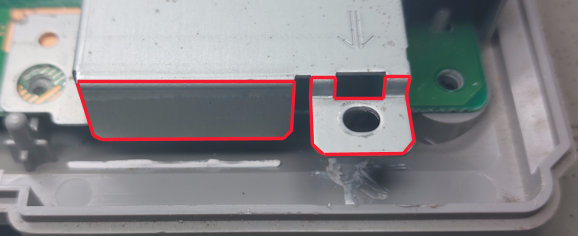
Step 7E: This is what it should look like once the metal has been removed.

Step 7F: Align the 3D printed drill template guide as shown and drill 5 small round elongated holes using a 2mm drill bit.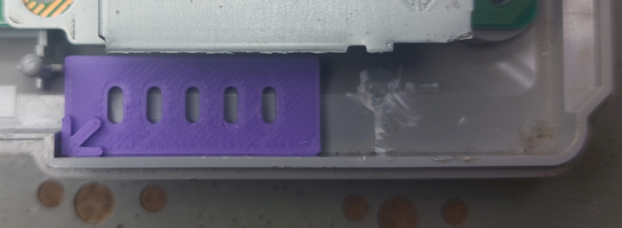
Step 7G: This is what it should look like after the 5 holes have been drilled.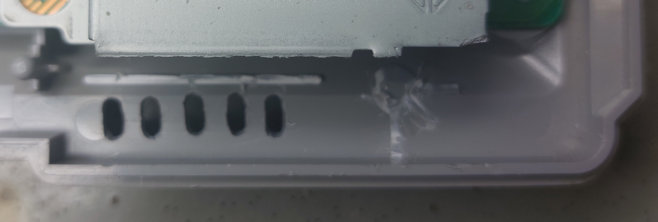
Step 8: Connect the other end of the included ribbon cable with the BLUE tab facing UPWARDS to the connector on the Medusa Sub Board.
Step 9: Using a very small amount of glue or double sided tape, stick down the Medusa Sub Board as shown below, make sure the surface of the console shell is completely flat before gluing the Medusa Sub Board down otherwise the touch sensor may not operate correctly.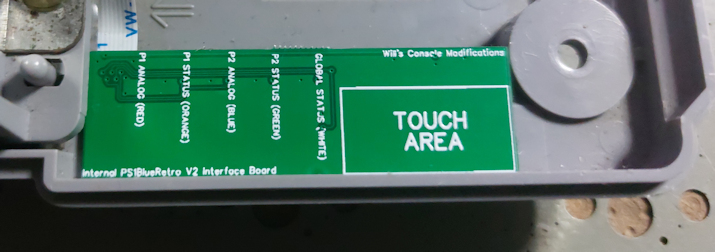
Step 10: Install the External WiFi / Bluetooth antenna and mount it as shown in the picture.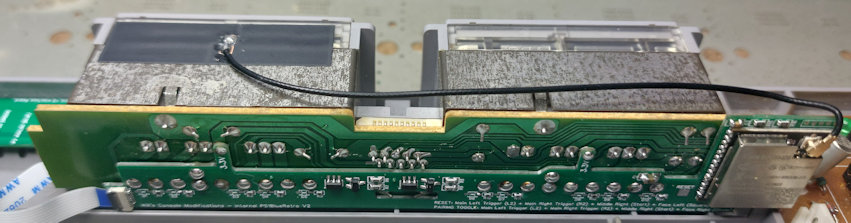
Step 11 (Optional):
There is a solder pad on the Medusa Main Board marked "RESET".
This is for In-Game-Reset functionality. If you would like this, then connect a small piece of wire from this pad and connect to a point on the Console Mainboard.
You can find diagrams on the link below depending on your motherboard revision.
Console Reset Points
Step 12: Test before re-assembling the console.
How To Use Basics
Touch Sensor Actions:Touch Sensor Press (<3s): Reset Console.
Touch Sensor Press (>3s & <6s LED's blink slowly) : Stop Pairing Mode OR Disconnect All BT controllers.
Touch Sensor Press (>6s & <10s LED's blink fast) : Start Controller Pairing Mode.
Touch Sensor Press (>10s LED's blink very fast) : Factory Reset BlueRetro.
LED Definitions (From Left to Right):
1st LED (RED): Controller Port 1 Status.
2nd LED (BLUE): Controller Port 1 Analog Mode Enabled.
3rd LED (GREEN):
Solid: An error occured, try power cycle, check serial logs for detail.
Pulsing: Bluetooth inquiry mode enable (new pairing).
Off: No error and Bluetooth inquiry mode disabled.
4th LED (RED): Controller Port 2 Status.
5th LED (BLUE): Controller Port 2 Analog Mode Enabled.
Button Mappings:
Click To View Spreadsheet
Latency Results:
PS4/PS5: ~5.4 ms
XBOX One: ~8.8 ms
Switch Pro: ~12.4 ms
PS3: ~12.8
WiiU Pro: ~13.2 ms
8bitdo: ~16.2 ms
Wiimote: ~16.3 ms
Changing Mappings & Multitap (Chrome):
1. Go to https://blueretro.io/ and connect to your Medusa Kit (make sure it's powered on and no controller connected).Multitap Config
None: Medusa will emulate the device selected in output config #1 on PS1 port 1.
Medusa will emulate the device selected in output config #2 on PS1 port 2.
Slot 1: Medusa will emulate a PS1 Multitap with 4 devices on port 1 as configured in output config #1-4.
Medusa will emulate the device selected in output config #5 on PS1 port 2.
Slot 2: Medusa will emulate the device selected in output config #1 on PS1 port 1.
Medusa will emulate a PS1 Multitap with 4 devices on port 2 as configured in output config #2-5.
Dual: Medusa will emulate a PS1 Multitap with 4 devices on port 1 & 2 (Total 8 devices) as configured in output config #1-8.
Alt: NA
Output Config
Mode
GamePad: Medusa will emulate a DualShock 2 controller.
GamePadAlt: Medusa will emulate a Flightstick (SCPH-1110 & Green LED mode).
Keyboard: Medusa will emulate a Lightspan Keyboard.
Mouse: Medusa will emulate a PS1 Mouse. (Must use "Default Mouse" preset)
Accessories
Only valid for "Gamepad" mode.
None: Medusa will emulate a DualShock 2 controller with rumble disabled.
Memory: NA
Rumble: Medusa will emulate a DualShock 2 controller with rumble enable.
Both: NA
How To Pair Specific Controllers:
Please see the GitHub page here for a comprehensive guide on how to pair controllers:https://github.com/darthcloud/BlueRetro/wiki/Controller-pairing-guide
FAQ / Known Issues / Limitations
Q. One motor doesn't work and speed is not the same as original controller.A. Dual Motor and Speed Control are not yet implemented.
Q. Variable button pressure isn't working.
A. Button sensitivity is not yet implemented.
Project Medusa - PS1 Internal BlueRetro Kit
- Product Code: PS1MedusaKit
- Reward Points: 40
- Availability: 21
-
£40.00
- Price in reward points: 400
Related Products

PS1/PS2 PSUnoRetro BlueRetro Adaptor
THE £999 PRICE IS JUST THERE AS A PLACE HOLDERTHE CORRECT PRICE OF £25 WILL BE CORRECTED WHEN STOCK ..
£999.00
Tags: playstation 1, ps1, playstation 2, ps2, wireless, unoretro, blueretro